¶ Osprey Lite
The Osprey lite software is used to provide direct and remote support for Impedo Duo and the VECTO power quality instruments. Access the user manual here.
¶ Osprey Lite Overview
¶ 🔄️ Download Osprey Lite
Click here to download Osprey Lite and .NET 9.0.
Please download .NET 9.0 before installing or upgrading Osprey Lite
Please note that some browsers may notify you erroneously that Osprey Lite is not commonly downloaded and provide you with the option to discard the software. Please click on the down arrow to the right of the notification and select “Keep” to save the Osprey Lite download.
¶ 🧩Layout
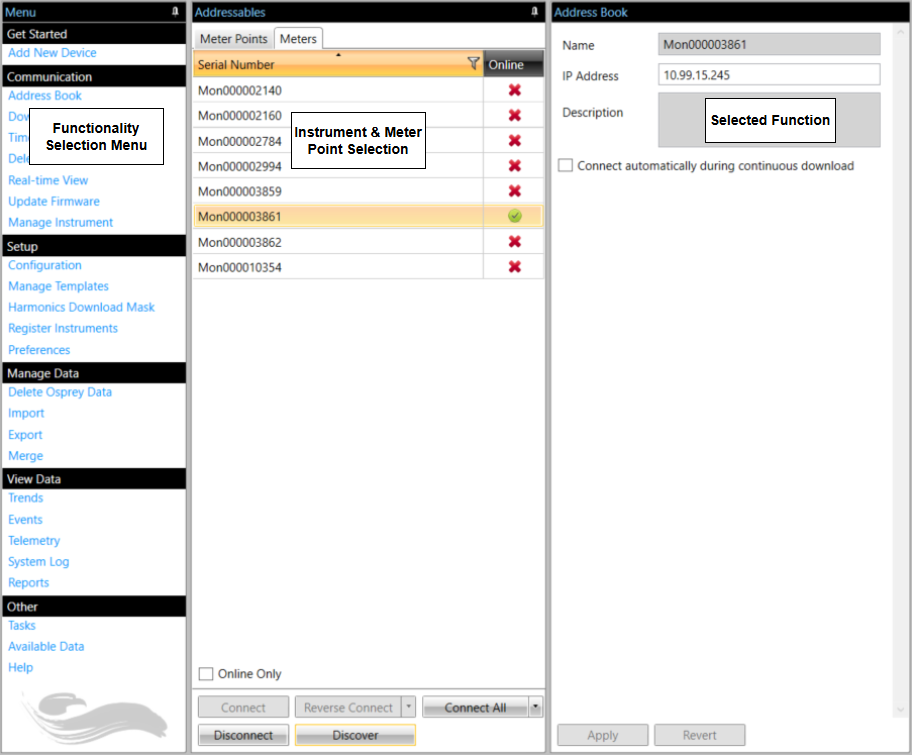
The figure below presents the typical layout configuration of Osprey Lite. The left panel is used to navigate the application and select a specific type of function, for example, data downloading or trend viewing. Most functions have a middle view, where the meter point or instrument to which the function applies is selected. The right panel contains the details of the selected function.
¶ ✅ Register Instruments
Each instrument has a unique key associated with it. This key must be entered into Osprey Lite before Osprey Lite and the instrument will trust each other and allow communication. An instrument’s key file will be shipped with it on a flash drive, but should it be lost it may be requested from the manufacturer.
To register an instrument in Osprey Lite:
- Open Osprey Lite and select Setup → Register Instruments using the navigation menu on the left.
- Next, click on Browse and select the desired key file(s) using the file browser (key files are named [serial].key, e.g. Duo000000001.key). Click Open to prepare the key to be loaded. The selected instrument should now be listed.
- Click Register to register the instrument in Osprey Lite. The instrument should now be listed in the middle panel when Setup → Address Book is opened and Meters is selected.
¶ 🤝 Establish Connection with a VECTO device
¶ Discovering Instruments
To discover all instruments on the LAN:
- Select Communication → Address Book
- Click Discover in the instrument selection panel
- All instruments that are accessible (i.e. for which the network rules allow it) will connect to Osprey Lite
- The IP address of the instrument will be filled into the address book automatically and the red cross in the Online column, in the middle panel will turn into a green circle with a checkmark inside.
¶ Setting an Instrument's Address Manually with Osprey Lite
The following steps explain the procedure to set the IP address that Osprey Lite uses to connect to an instrument:
- Select Communication → Address Book
- Select the desired instrument
- Enter the instrument’s IP address and select Apply.
- Connect to the instrument by selecting Connect in the middle panel.
¶ Setting an instrument's Address Mannually with USB Stick
The TCP/IP configuration of the instrument can be configured via USB as follows:
- Format a USB stick with the FAT32 file system
- Create a directory in the root folder of the device called EthernetSettings
- Copy the instrument key into the folder – its name must be [serial].key, e.g. Mon000000001.key
- To configure the instrument for DHCP server, the folder may not contain a file called ip
- To configure the instrument for static IP parameters,
a. Create a file in the folder called ip with contents the IP address to use, e.g. 192.88.90.11
b. Create a file in the folder called netmask with contents the netmask to use, e.g. 255.255.255.0
c. Create a file in the folder called dns with contents the DNS server IP address to use, e.g. 8.8.8.8
d. Create a file in the folder called gateway/ with contents the gateway to use, e.g. 192.88.90.1 - Insert the USB stick into the device to be reset
- The change should be complete within 60 seconds
¶ 🛜 Wi-Fi
¶ Configuring Wi-Fi via Osprey Lite
The WIFI can be configured as an access point when connected via Ethernet as follows:
- Establish a connection to the instrument.
- Open Communication → Manage Instrument.
- Select WiFi Settings.
- Select Enable or Disable to enable/disable WiFi on the instrument
- Select Access Point to configure the instrument as an access point. The SSID of the instrument will be its serial number if left blank. If the password is left blank the access point will not require authentication. If set, the password must have at least eight characters.
- Select Infrastructure and configure the SSID and Password to connect to external access point. Leave Password empty to connect to an open access point.
- Once the desired configuration is entered, click Save.
¶ Enabling Wi-Fi via USB
The WIFI can be configured via USB as follows:
- Format a USB stick with the FAT32 file system
- To configure the device as an access point
a) Create a directory in the root folder of the device called EnableWifiAp
b) Copy the instrument key into the folder – its name must be [serial].key, e.g. Mon000000001.key
c) If a non-default SSID is required, create a file in the folder called ssid with the contents of the SSID to connect to, e.g. MY ACCESSPOINT
d) If a non-default WPA PSK password is required, create a file in the folder called Password with contents of the password to use, e.g. superSecret94 - To configure the device to connect to an access point
a) Create a directory in the root folder of the device called EnableWifiInf
b) Copy the instrument key into the folder – its name must be [serial].key, e.g. Mon000000001.key
c) Create a file in the folder called ssid containing the name of the SSID to connect to, e.g. MY ACCESSPOINT
d) If the access point requires a WPA PSK password, create a file in the folder called password containing the name of the password to use, e.g. superSecret94
e) If a WIFI watchdog should be enabled, create a file in the folder called watchdogaddress with the watchdog address to use. - Insert the USB stick into the device to be reset.
- The change should be complete within 60 seconds.
¶ 🌐 Modem
¶ Configuring Modem via Osprey Lite
The on-board modem can be configured as follows:
- Establish a connection to the instrument
- Open Communication → Manage Instrument
- Select Modem Settings.
- Select Enable or Disable to enable/disable the modem
- Select the APN to use (obtained from your cellular network provider).
- If a modem watchdog should be enabled, select the Watchdog Address to use.
- Once the desired configuration is entered, click Save
¶ Enabling Modem via USB
The on-board modem can be enabled via USB as follows:
- Format a USB stick with the FAT32 file system
- Create a directory in the root folder of the device called EnableModem
- Copy the instrument key into the folder – its name must be [serial].key, e.g. Mon000000001.key
- Create a file in the folder called apn with the APN to use
- If a modem watchdog should be enabled, create a file in the folder called watchdogaddress with the watchdog address to use.
- Insert the USB stick into the device to be reset.
- The change should be complete within 60 second.
¶ 🖥️ HMI
¶ Enabling the HMI (on-board Web Interface) Osprey Lite
The HMI (on-board Web Interface) can be enabled via Osprey Lite as follows:
- Open Communication → Manage Instrument
- Select Service Settings
- Select Web Interface Service and click Save
¶ 🛠️ Measurement Point Configuration
A measurement point is uniquely identified by the name given to it. If the exact same meter point name (including case and white space) is used somewhere else it is considered to be the same meter point. A meter point name cannot be changed once it is created, but the data can be merged into another meter point under certain conditions. Care should thus be taken when assigning meter point names.
¶ Creating a New Measurement Point
Click here to create a new measurement point in Osprey Lite.
¶ Editing a Meter Point
To edit a meter point the meter point must be online.
- Navigate to Setup → Configuration: Meter Point
- Select the meter Point in the meter point selection panel
- Edit the meter point and click Commit
¶ Attach or Detach a Meter Point
A meter point can be detached from one instrument and attached to a different instrument.
How to attach a meter point:
- Navigate to Setup → Configuration: Meter Point
- Select your chosen measurement point
- Select Attach
- Select your chosen Instrument and click OK
How to detach a meter point:
- Navigate to Setup → Configuration: Meter Point
- Select your chosen measurement point
- Click Detach
¶ 📊 Manage Data
¶ Download Data
Data can be downloaded with the Download Data function. Select the instrument to download data from and connect to it, if it is online. Data cannot be downloaded while the instrument is offline. Downloads in progress will show under Other → Tasks view.
¶ Import / Export Data
Data can be exported from Osprey Lite as CSV, XML (for import by MS Excel), PQDIF, EPQDIF (Eskom Format) or DB Transfer data under Manage Data → Export. CSV and XML files can be viewed in Microsoft Excel or a text viewer. PQDIF files can be viewed with third party tools. DB Transfer files are binary files that can be imported into another instance of Osprey Lite.
When exporting data as DB Transfer, the user may opt to include the meter keys. When this option is selected the transfer file will contain all the meters and their keys. If it is not selected the transfer file will contain only the meter metadata, but not the meter keys.
To import data, select Manage Data → Import.
If the data is a DB Transfer file, select From File and specify the file location.
Alternatively, data can be imported from another Osprey Lite installation by choosing the From Host option and specifying the IP address of the host to connect to. In this case, all data will be imported the first time after which only new data will be imported from that specific host.
Import/Export sessions in progress will be displayed in the Other → Tasks view. The import/export is only complete once the task is removed from the view. Exported files may have a zero file size until the export is complete.
¶ Delete Data
Osprey Lite allows the user to delete data from connected instruments or from Osprey Lite’s own database. To delete data from the instrument select Communication → Delete Meter Data. The user can either select a meter point from the list of online meter points, or select an instrument from the list of online instruments. For a meter point several delete options are available. When the user selects a meter, the user can delete either all meter points on the instrument, all data from all meter points on the instrument, or delete a specific meter point from the instrument. Note that the delete functionality only kicks off the deletion process on the instrument. The progress of the deletion may be inspected by downloading the log events from the instrument and inspecting them with the function View Data → System Log.
To delete data from Osprey Lite’s database, select Manage Data → Delete Osprey Data. The user will again be presented with a list of delete options. The delete action is executed as a task which will be listed in the task lists that is visible at Other → Tasks. Any errors will be logged to the system log.
¶ Factory Reset Instrument
To reset an instrument to its factory shipped settings (deleting all data and user configured changes on the instrument):
- Open Communication → Manage Instrument
- Select the target instrument
- Verify that the correct serial number is shown
- Select Reset Instrument under the Control section
- Click Execute
Note: This step cannot be undone once commenced and will result in an automatic instrument reboot.
¶ 🖥️ View Data
Real-Time View
Once a meter is attached to a meter point it is possible to obtain a real-time view of the data currently being measured.
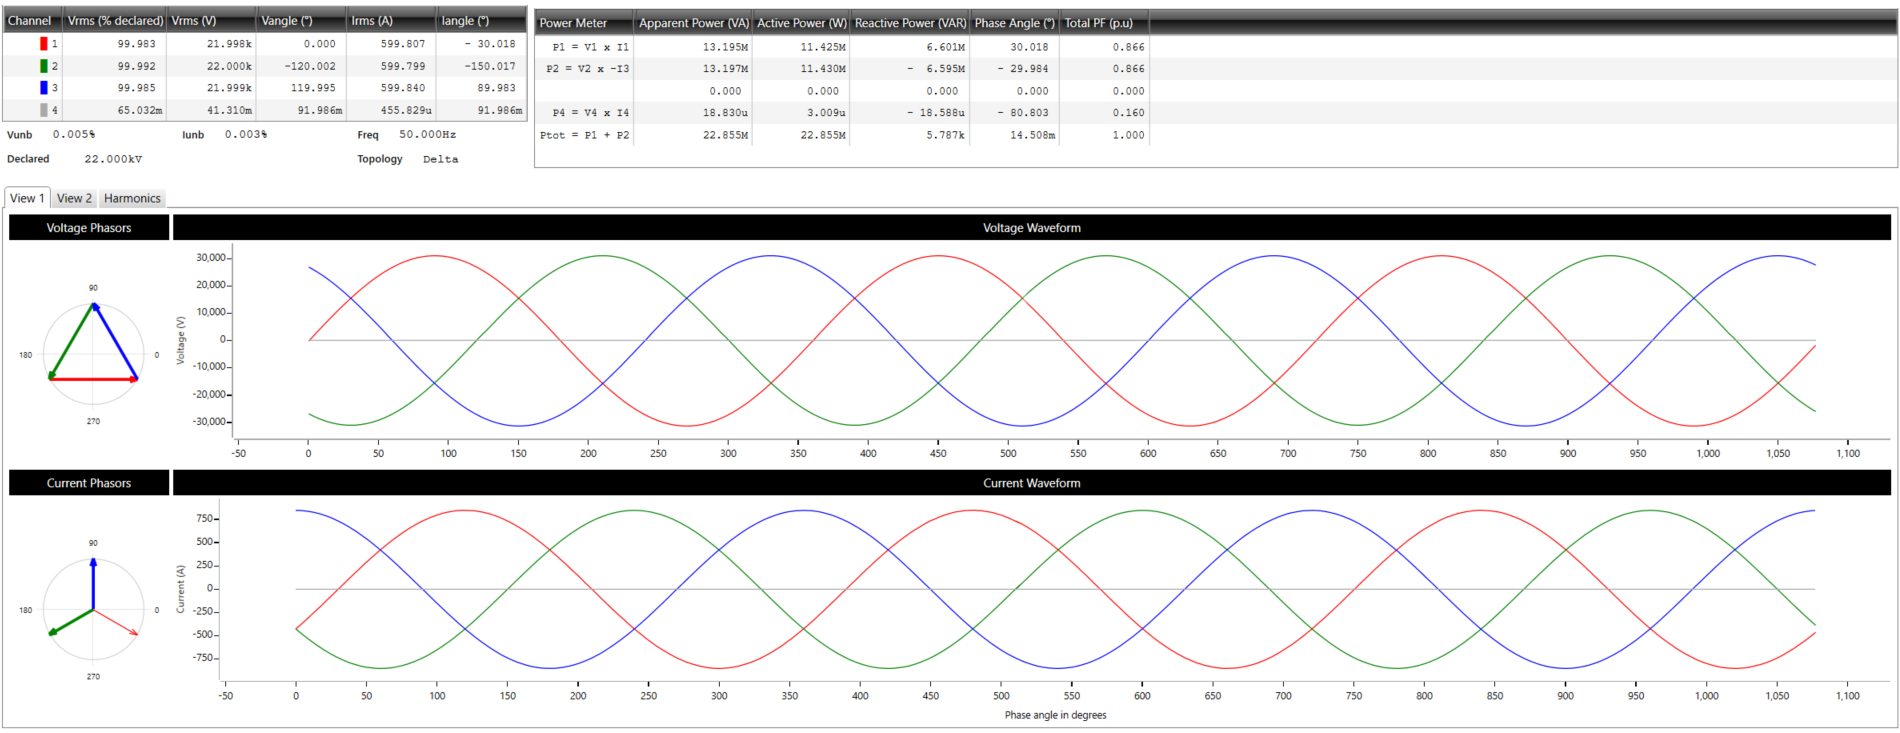
To obtain the real-time view select Communication → Real-time View then and Continous Read. The Real Time View of the voltage and current phase and magnitude according will now be displayed as in the image below
Select Continous Read again to exit the continous read view.
Ensure that the correct measurement point is selected in the top left corner.